How To Install WordPress With Bluehost
When we installed WordPress with Bluehost, we were pleasantly surprised by how easy it is – all you have to do is sign up, and Bluehost will take care of the rest for you. We’ve broken down our experience in this guide so that you can do it, too. No technical headaches involved!
After hours of hands-on testing and research, we know Bluehost inside and out. But we’ve also spoken to other Bluehost users, as well as some pro WordPress developers, to give you the best possible guide on how to install WordPress with Bluehost.
Follow these Steps:
1. First You need to Signup For Bluehost and Take a Hosting Plan
2. Install Wordpress on Bluehost
3.Setup Your Wordpress Website on Bluehost
How to sign up with Bluehost

Here’s how to get up and running with your Bluehost account…
1. Choose a hosting plan
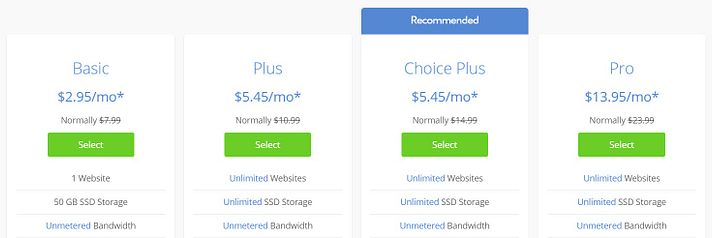
The first step is to select a hosting plan that will meet your needs. Bluehost offers a range of hosting options including…
If you’re not sure which plan is best for you, we recommend starting with the cheap shared hosting plan, which starts at just $2.95 a month.
Here is some further reading to help you choose the right hosting plan for your project…
2. Create a new domain name
With all the Bluehost plans, you get a free domain name for the first year.
Once you have selected your hosting plan, select Create a New Domain to choose your free domain name.
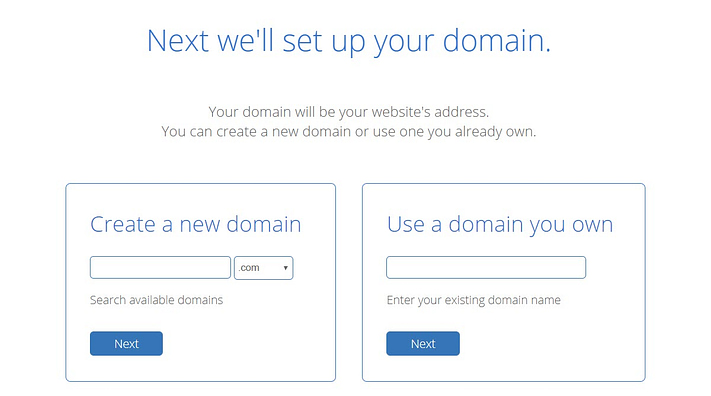
Type your chosen domain name into the domain search, and Bluehost will then display a list of available domain extensions or similar available domain names.
(If you have registered a domain with a third-party domain registrar then you can use this domain name instead of creating a new one with Bluehost. To do this, you will need to point your domain name to Bluehost’s nameservers – a process that Bluehost can walk you through).
3. Enter Bluehost account details
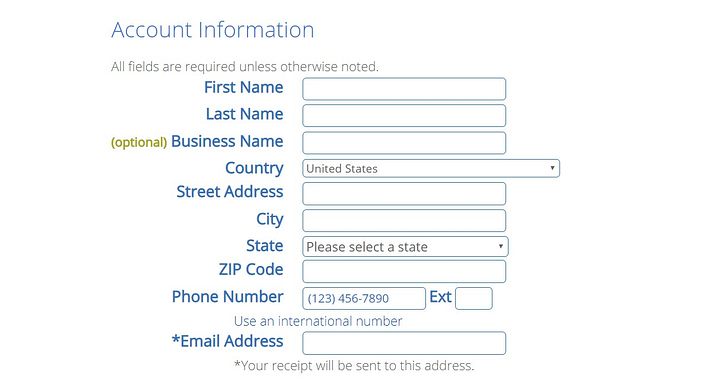
Next, Bluehost will ask you to fill out some personal information to create your account. Or, you can sign in with Google to speed up this process.
4. Confirm hosting plan details
Bluehost will now display your plan details. Check them carefully, as by default Bluehost adds several premium ‘extras’. These include…
- Domain Privacy Protection (from $11.88 a year)
- SiteLock Security (from $23.88 a year)
- CodeGuard Basic (from $2.99 a month)
- Bluehost SEO Tools (from $23.88 a year)
Unless you already know that you need a certain service, we’d recommend de-selecting all of these add-ons. None of them are essential and you can always add them later if needed:

Under Account Plan, you can also set the number of years you want to sign up to Bluehost for. The minimum commitment is 12 months, but you can get a bigger discount if you commit to multiple years up front.
5. Enter your payment details
The last step in the Bluehost sign up process is to enter your payment details and confirm the order.

Remember, Bluehost provides a 30-day money-back guarantee, so if you are unhappy with your plan or the hosting service after purchase, then you can ask for a refund.
Bluehost will now go ahead and set up your new hosting plan and domain name. You will then receive an email with payment confirmation as well as your new account information, including login and password details.
How to install WordPress on Bluehost
Once you’ve purchased your hosting plan, you next need to install WordPress on Bluehost. Again, this is a relatively quick and easy process, helped by Bluehost’s user-friendly interface and its one-click WordPress install feature.
1. Log in to Bluehost
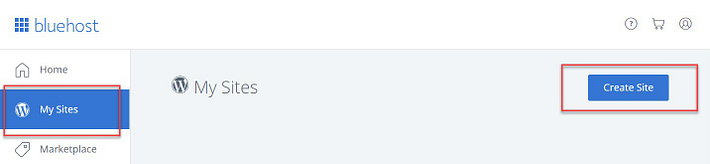
To get started:
Log in to your new Bluehost account.
Go to the My Sites tab.
Click the Create Site button in the top-right corner.
2. Enter your website info
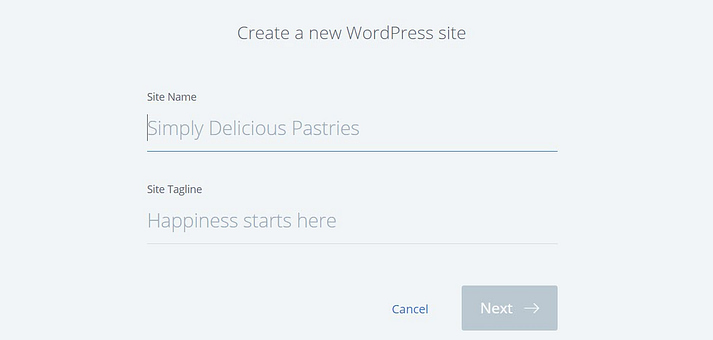
Next, you need toenter some basic information about your website, including the Site Name and Site Tagline. Don’t stress too much – you can always change these later:
3. Choose your domain name
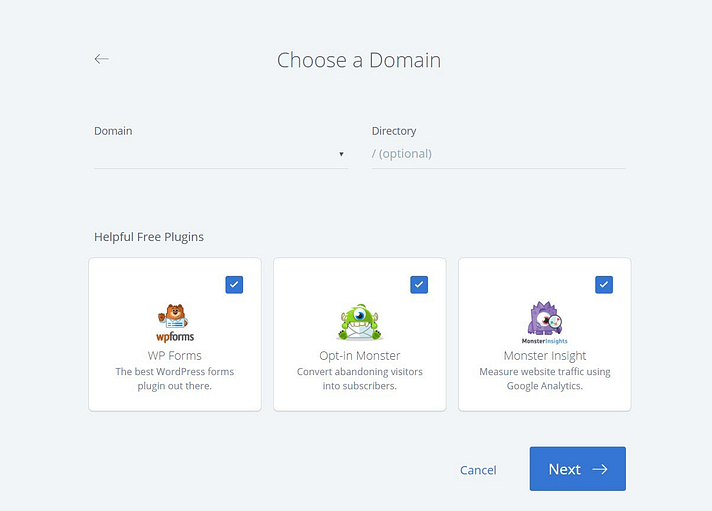
Use the Domain drop-down to select the domain name that you chose when you created your Bluehost account.
You can also choose whether or not to install some of Bluehost’s recommended plugins.
4. Click “Next” to install WordPress on Bluehost
Bluehost will now install WordPress for you, creating your new WordPress website, and displaying your log in details.
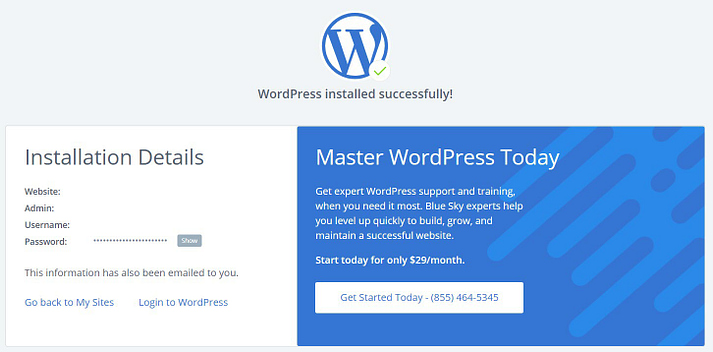
To open your new WordPress website, click the Login to WordPress link.
Comments
Post a Comment